 BASSMAP
Guide
How to find the best subwoofer position
Updated
The best subwoofer position is the one that gives the most even bass across all the seats you use, not the loudest bass at one seat. Find it by testing a short list of candidate spots, measuring every seat for each, and comparing. Set level and delay after you choose a spot, and use EQ last.
Why you have to test instead of following a rule
Rules like "put it in a corner" or "put it a third of the way along the wall" describe idealized rooms. Your room's dimensions, openings, furniture and wall construction all shift the room modes and reflections that decide what each seat hears. The quickest reliable route is a short experiment: try a few positions, measure, keep the best one.
Pick candidate positions
Choose three to six spots you could actually live with. Useful candidates to include:
- A front corner, for reference: usually the most output and often the least even response.
- The midpoint of the front wall, which drives odd-order width modes weakly.
- Positions roughly a quarter or a third of the way along the front wall.
- If the room allows, a spot along a side wall or near the rear wall.
Keep the subwoofer close to the wall behind it unless you are deliberately testing distance. A sub well out from a wall gets a cancellation from that wall's reflection at about c / 4d, where c is 343 m/s and d is the distance to the wall.
The placement test loop
- Turn off room correction and sub EQ. You want to see what placement does on its own. Leave the crossover at your normal setting.
- Define the listening area. Note every seat you care about, not only the main one. If one seat matters most, decide that now so it does not shift after you see the results.
- Place the sub at the first candidate. Face it the way you would leave it, and keep the volume at a fixed, moderate level for every test.
- Measure the whole listening area. Cover every seat, at roughly ear height. Measure in the same way for every candidate so the results compare fairly.
- Record the result. Save the measurement with the position, for example "front wall, 1.2 m from left corner".
- Repeat for each candidate. Change only the subwoofer position between runs.
- Compare and choose. Prefer the position with the smallest differences between seats and the fewest deep nulls in the range you care about. A broad peak is acceptable; EQ can bring it down.
- Then set level, delay and EQ. Match the sub's level to the main speakers, check that sub and mains add up through the crossover region, and cut the remaining peaks.
What should I look for when comparing positions?
Look at seat-to-seat consistency first. A position that gives a flat response at the main seat but a deep dip one seat over is a poor choice for a family sofa. Then look at nulls: a narrow, deep dip that appears at several seats is hard to fix later, because adding EQ boost mostly feeds energy into a cancellation (see why bass disappears in some spots). Peaks matter less at this stage, because they are the part EQ handles well.
If two candidates are close, choose the one that also suits the room: cable runs, furniture and how the sub looks matter if you will live with it for years.
When the seats disagree
In most rooms no single subwoofer position is ideal for every seat. You can weight the main seat more heavily, accept a little less output for a more even sofa, or move the seating. Moving the sofa away from the exact middle of the room and slightly away from the rear wall often helps, because those spots sit on the null and the maximum of the first length mode. The standing waves guide shows where those spots fall.
When to add a second subwoofer
If every single position leaves big seat-to-seat differences, a second sub is often the most effective next step. Two subs at the midpoints of opposite walls can cancel some modes instead of exciting them, an approach analyzed by Welti and Devantier in "Low-Frequency Optimization Using Multiple Subwoofers" (JAES, 2006). Use the same test loop: move one sub at a time, then match levels and delays.
Why EQ comes last
EQ changes the signal at every seat by the same amount, but the room's problems differ from seat to seat. Placement first reduces those differences, so the remaining EQ correction suits more of the audience. Cut peaks; be cautious about boosting dips. Reading the curves is covered in how to read a subwoofer frequency response.
Quick alternative
If you cannot measure, the subwoofer crawl narrows down candidate spots by ear. Verify the winner with a measurement if you can.Running this loop with BassMap
BassMap fits step 4: instead of one microphone point per seat, you walk the listening area with your iPhone while the app plays a low-frequency test signal through your system, and it maps each tone's level across the area you covered. Mark the sub and the seats on the map, save a scan for each candidate, and compare two scans side by side. Levels are relative, which suits comparing positions; BassMap does not give calibrated SPL.
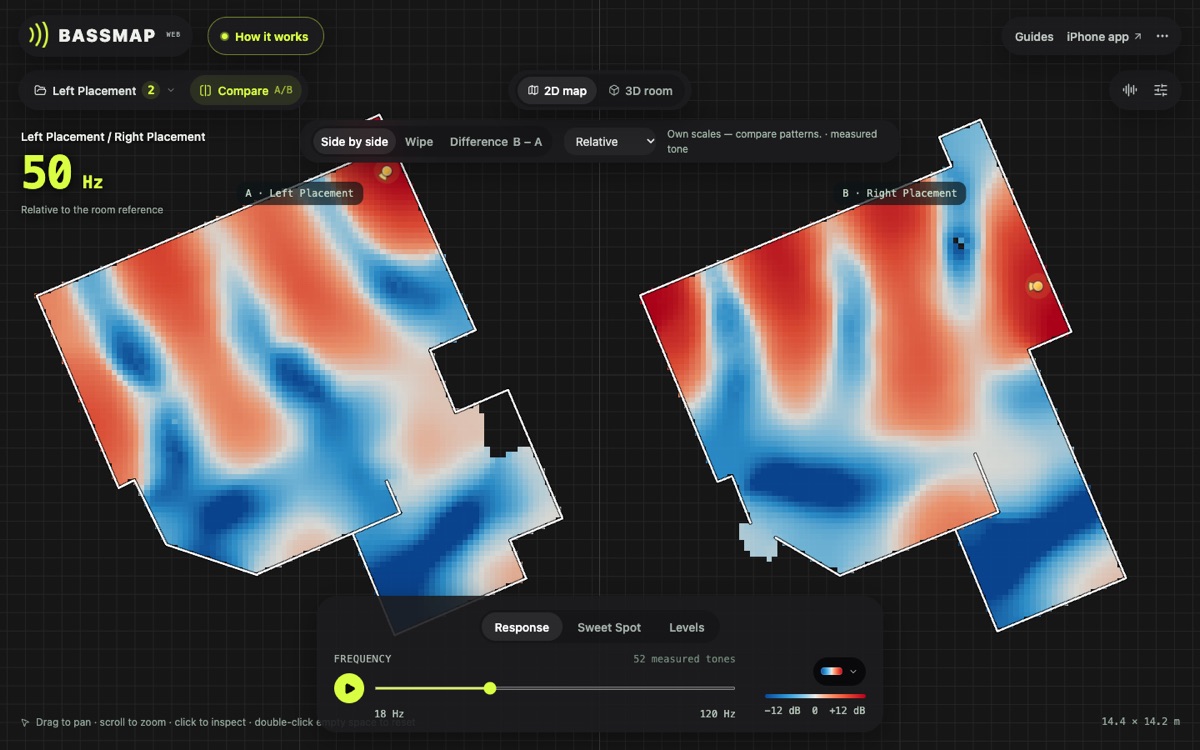
You can try the comparison without measuring anything: the web viewer opens with these two real recordings, and Compare shows them side by side, as a wipe, or as a difference map.